Emulate Automatic Link Suggestions in Your Note-Taking App and The Archive
If your note-taking app of choice doesn’t support auto-completion to suggest links while you type, what can you do?

Not all software can implement the exact same feature that I’d like it to have. Then I try to figure out ways to use a tool to do what I want, breaking down the feature into more basic steps, each of which I could do manually, if needed. This works surprisingly well most of the time.
Let’s figure out the options you do have if you want to add a link from A to B, but don’t know the ID of B, yet, only parts of its title. How can you and your software of choice work together to create a link?
For example, Sascha and I have been using nvALT to great success with a couple of AppleScripts to automate Zettel ID creation, even though there were no clickable links to navigate our notes. You may recall we have been advocating to manually follow links when your app doesn’t allow clicking on them by simply searching for the ID. We ate our own dogfood, telling folks that links are just a more convenient way to perform a search, and we worked in that exact way for years until we switched to our own app.
What is a similar manual process replacement for auto-completion of links? What can you break this feature down into, and how can your note-taking software help get the job done?
What really is auto-completion of links?
In an ideal app, you would select the link target from a list that pops up while you type.
You could call this feature “auto-completing” of links or “link suggestions”. In the convention to place inter-note links via [[wiki links]], that could mean you type the two opening square brackets, [[, and then expect the app to offer some user interface widget to help you find what you are looking for right there, right now.
This can be broken up into these steps, that we’ll examine individually in a second:
- Denoting a link. That’s you typing
[[before and]]after the linked word. - Finding a link target. Visually, that often boils down to a search widget as a popup that doesn’t affect your currently selected note. In other words, it’s a new, independent search context.
- Inserting the link target between the square brackets.
Denoting a link
In the worst case, step 1, denoting a link, means hitting the keys on your keyboard: two pairs of square brackets. Some apps provide the closing bracket for you, so it’s either 4 or 2 keystrokes.
In the best case, the “insert link here” command could be a shortcut that saves you from typing all 4 characters.
Honestly, I don’t think this step is a hurdle. Typing the brackets is simple, and I also prefer it to memorizing a shortcut for this simple task. Next.
Finding a link target
To find a link target is the actual auto-completion or link suggestion part.
If your app of choice doesn’t offer a widget for this that pops up, what can you do? Are you screwed?
Not at all: You can still manually search for the target note!
“But if I search in my archive, I’m taken away from the note I want to edit!”, you may cry out in despair. Good point.
A link suggestion widget is actually creating a temporary search context for you. You can abort it, nothing happens; you can confirm the selection, and the link is inserted for you. The main app, your current note and the main search, are not affected.
You can emulate the result to some degree with a few simple tricks.
Recall how Sascha and I have manually done the work of the computer to follow links: select the linked-to ID, copy it, got to the search bar, paste the copied ID, and then look at the resulting note.
For link auto-completion, you can do the same and perform each step manually. You will want to do this in a way that allows you to restore the current context. Here, this means to get back to the note you are editing before you leave and search for another note to link to.
Metaphorically, you want to leave a finger or a bookmark between the pages of your notebook to quickly get back there. To achieve this, employ the Q-trick: type qqq right where your cursor is to leave a temporary jump mark. That’s a unique search term. Later, you can search for “qqq” and get back to the exact place where you left the unfinished note. Then you remove this temporary bookmark string again and end up more or less where you left off.
So this step boils down to these actions:
- Make the current context restorable. We can use to Q-trick for that, inserting
qqqin the place of the link. - Search in your archive as usual to find the note you want to link to.
- Copy the ID of the note.
- Restore the context, e.g. by searching for
qqq. - Remove the temporary “
qqq” from the note once you reach it.
Inserting the link text
In an automated feature, the work of the computer would be to type text between the square brackets for you.
With the manual work you just completed in the previous step, this boils down to pasting the ID from your system clipboard. That’s it. ⌘V.
Ways to preserve and restore context in The Archive
I was inspired to write about this manual and technique in part because our beloved users of The Archive request the auto-completion to be added as a feature.
We do understand that this is useful and saves some time and effort – after all, the manual process outlines above is a bit tedious at first, though you get used to it with time. The Archive doesn’t support this exact feature, yet.
But The Archive does come with a couple of other features that you might not have thought to be useful for this purpose:
- The navigation history preserves context as well: from the note you are editing, you can just start a new search and look around until you find the target. Then you hit the “Back” button (Cmd-Ctrl-left arrow) until you get back to where you left off. Paste the ID, and you’re done.
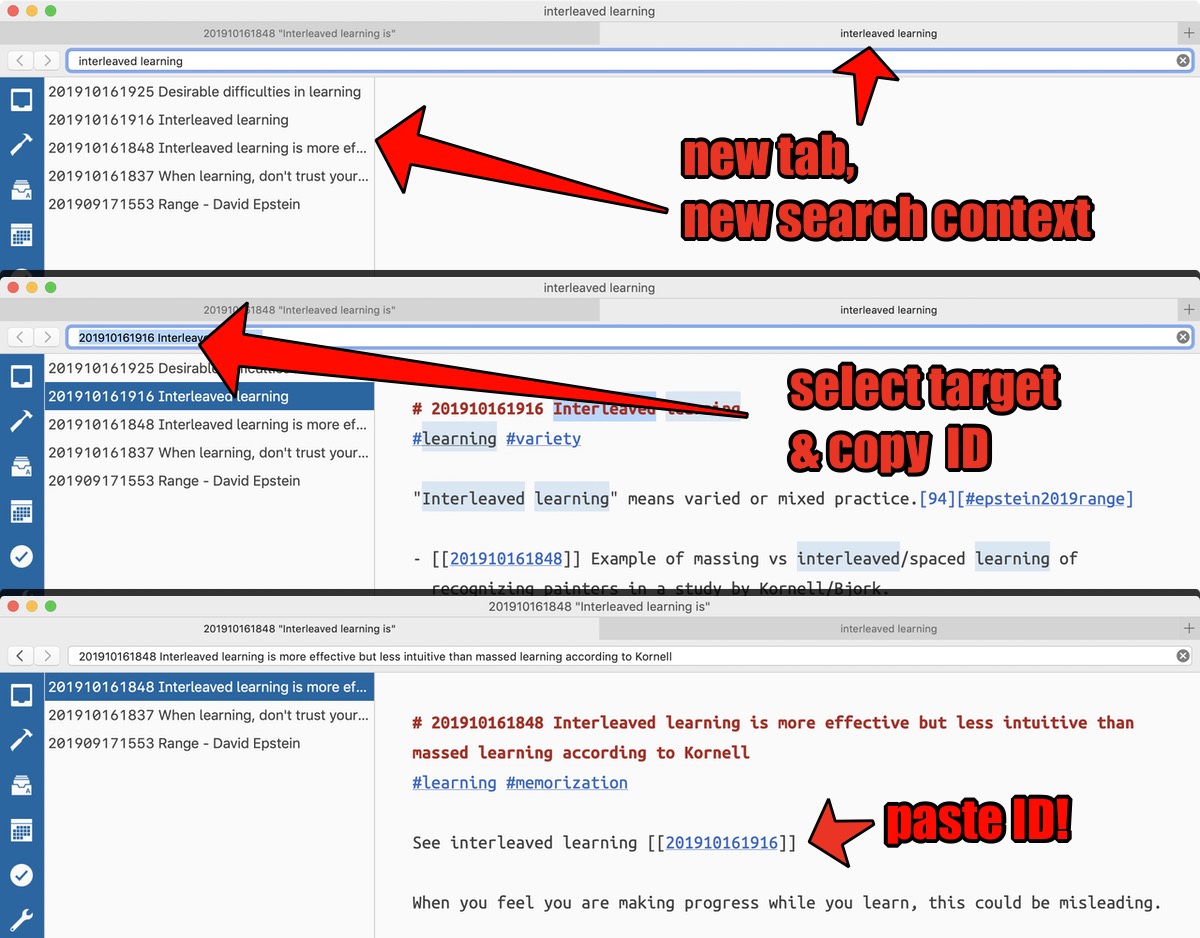
- Tabs and multiple windows are a very literal implementation of independent search contexts. You can skip the Q-trick completely and open a new tab, search for the link target to your hearts content, copy its ID, then close the temporary tab again and paste the ID. The original tab will not be affected at all: the editor still looks the same, and if you left the cursor between the square brackets, you can simply hit Cmd-V to paste the ID directly.
Multiple tabs are already very close to a dedicated auto-completion widget. They are displayed differently, but underneath, the same thing is happening: the search is isolated from your current editing session. You have to copy and paste the link ID manually, true, but that’s all there is left for you to do.
Concluding
I find it helps to conceptualize features and problems in a way that may look rediculously fine-grained.
To come up with manual solutions for a lack of computerized features, I find that the practice of Wizard-of-Oz Software-Demoing helps. There, you design features and specify user input and expected output on the device; but instead of coding an app to do it, you secretly perform the requested task manually. If you can imagine to manually simulate the result a computer doing the work, then you have already broken down a software feature into simple steps that you can do in any app.
If you try to break down killer features of your favorite software this way, I bet you’ll figure out ways to get a similar result that’s at least 80% as good by doing some things manually. Why would you bother, though? – Well, the upside of coming up with this is that you learn to become independent from specific software.
You’re not helpless when you have to retrieve your data from a backup on a computer that doesn’t have your favorite app, or operating system, installed.
Software agnosticism is really a mindset where you stay in control as much as you can. The bonus of control is that you not give up your autonomy willy-nilly by getting used to a particular app too much.
As you know, infatuation with a particular software solution may end in heart-break and pain when you discover it isn’t going to be developed any longer and your data is locked away. We want to help you avoid this pain, and I hope this exercise helps!